Are you trying to decide whether the Haloview BT7 Touch RV Backup Camera Wireless 2.4G Digita FHD 1080P DVR Rearview Full-Color Night Vision Cam and 7″ Touch Screen Monitor System is the right upgrade for your RV, truck, trailer, camper, or van?

Quick snapshot: what this system offers
You want a clear, reliable wireless backup solution that records events, reduces blind spots, and keeps things simple to install. This system combines a 7″ 2.5D curved glass touch monitor with a 1080p camera, wireless transmission, and a built-in DVR so you can both view and capture your drives and parking maneuvers.
| Feature | Detail |
|---|---|
| Monitor | 7″ 2.5D curved glass touch screen, responsive touch controls |
| Camera Resolution | 1080P FHD (1080P@30fps) |
| DVR | Built-in recorder with real-time recording and playback |
| Wireless Tech | 2.4 GHz digital transmission, low latency |
| Wireless Range | Up to 984 ft line-of-sight |
| Viewing Angle | 120° wide-angle lens |
| Power Input | 10–32V wide voltage input |
| Multi-Camera | Supports up to 4 wireless cameras |
| Vehicle Compatibility | Designed for vehicles up to ~65 ft (RV, trailer, truck, camper, van, pickup, tractor, fifth wheel, motorhome) |
| Night Vision | Full-color night vision capability |
| Smart Features | Smart brightness adjustment, low-latency tech |

Haloview BT7 Touch RV Backup Camera Wireless 2.4G Digita FHD 1080P DVR Rearview Full-Color Night Vision Cam and 7
$399.99 In Stock
Camera hardware and image quality
You want to know if the camera will give you usable images in real-world situations. The Haloview BT7 camera shoots at 1080p @ 30fps and comes with a 120° field of view, which is wide enough to cover most rear blind spots and trailer hitches while still keeping objects readable.
The full-color night vision is a standout feature compared with more traditional monochrome night cameras. Because it keeps full color in low light, you’ll be better able to distinguish taillights, lane markings, and surrounding objects at dusk or dawn.
Lens and viewing angle
The 120° wide-angle lens strikes a good balance between a broad field of view and minimal fisheye distortion. You’ll be able to see both corners of trailers and the immediate area behind your vehicle without extreme warping.
You should expect some barrel distortion at the very edges (normal for wide-angle lenses), but important objects like vehicles, people, and curbs will remain easily identifiable.
Night performance and full-color night vision
Night performance aims to keep colors visible rather than reverting to the typical black-and-white infrared look. You’ll find that safety details, such as brake lights and reflective tape, are easier to identify with color imagery.
Keep in mind that full-color night vision typically relies on improved sensors or additional low-level illumination; while it enhances visibility, very dark scenes will still be limited by available light. If you regularly operate in pitch-black conditions, consider auxiliary lighting as a supplement.


Monitor, controls, and user interface
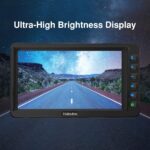
You’ll be using a 7″ 2.5D curved glass touch screen that’s built for responsive, intuitive interactions. The touchscreen makes switching camera views, reviewing footage, and adjusting settings quick and convenient.
The smart brightness adjustment automatically reduces display brightness in low-light conditions to minimize eye strain when you’re driving at night. This makes nighttime monitoring less distracting and more comfortable.
Touch experience and responsiveness
The curved glass touch surface feels modern and smooth, and the system is designed for low-latency control. You should be able to tap to change camera angles or start playback without noticeable lag.
If you prefer physical buttons for certain functions, check the included manual — some systems include tactile controls on the monitor housing or remote access through a menu system for essential features.
Built-in DVR and playback
The Haloview BT7 includes a real-time recorder so you don’t need an extra device to capture footage. You can record events at 1080p and play them back directly on the monitor, which is great for quick checks after a maneuver or incident.
You’ll want to confirm the maximum supported SD card size from the manual before buying storage. Using a high-quality, high-endurance SD card designed for continuous recording is recommended for reliability.
Wireless transmission and latency
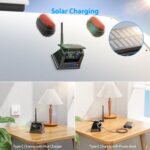
You’ll appreciate the convenience of a wireless connection when you don’t want to run long video cables down a trailer tongue or through a camper wall. The 2.4 GHz digital transmission provides a long line-of-sight range — up to 984 feet — and supports up to four cameras.
Low latency is emphasized with “new-gen wireless technology,” which should reduce lag that can otherwise make backing or hitching feel disconnected or unsafe. In practical use, low latency is essential for responsive real-time camera use while maneuvering.
Range in practical terms
Line-of-sight range numbers are helpful but don’t always reflect real-world conditions. You’ll usually see reduced range in urban or metal-heavy environments such as RV parks, garages, or in convoy travel where other vehicles and structures can block signals.
For towing large trailers or operating in open highways, the up-to-984 ft rating means you’ll have ample distance for a clean connection when there are no obstructions.
Handling interference and multi-camera operation
Because the system uses 2.4 GHz, it shares spectrum with Wi-Fi and other wireless devices. You can reduce interference by placing antennas for monitor and camera away from known noise sources and, when possible, aligning antennas for line-of-sight.
If you use multiple wireless cameras, the system’s ability to accept up to four feeds gives you flexibility. Switching between cameras or setting split-screen views (if supported) will help you monitor multiple angles without wiring complexity.

Power and compatibility
The 10–32V wide voltage input covers most vehicle electrical systems, so you can use this on 12V cars and 24V trucks without needing special converters. That makes it very versatile across small to large vehicles.
Compatibility notes in the product description say it supports installation on vehicles up to 65 ft. That means it’s intended for long motorhomes, fifth wheels, and larger trailers when properly mounted and paired.
Wiring and power tips
When you wire the camera, always use proper fuse protection near the power source. You’ll need a solid ground connection and continuity checks to avoid intermittent power issues.
If you aren’t comfortable wiring to ignition or reverse power circuits, consider professional installation — especially on diesel or complex electrical systems on motorhomes.
Installation: what to expect
You’ll find that wireless systems reduce the need for long coax runs, but mounting and power still take time and care. Plan your installation steps, gather tools, and read the manual before you start.
Below are practical steps and tips to make the install smoother so you don’t waste time or damage components.
Pre-install checklist
You should confirm these items before drilling or mounting:
- Decide camera mounting location (centered on rear or hitch area).
- Verify monitor mounting position for visibility without blocking your view.
- Gather wire, connectors, fuse taps, silicone sealant, and basic tools.
- Purchase a high-endurance SD card for DVR use (check manual for size limits).
Mounting the camera
You’ll want the camera centered and level for the most intuitive view. For RVs or trailers, mounting the camera at a higher point gives a wider perspective; for trucks and pickups, a lower position helps when monitoring hitch area.
Use gasket or silicone to weatherproof the mounting hole and keep water out. Make sure the camera cable routing avoids pinch points and heat sources.
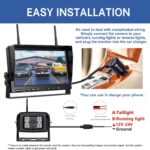
Wiring power to the camera and monitor
With a 10–32V input range, you can wire to any suitable vehicle power source: reverse-triggered power for automatic switching on reverse, or constant power if you want continuous recording.
Always use an inline fuse close to the battery and maintain a proper ground. If you route wires through walls, use grommets to protect wiring and avoid chafing.
Pairing the camera and monitor
Pairing is usually straightforward: power both devices, follow the on-screen pairing prompts, and give the system a few moments to establish a stable connection. If you’re adding additional cameras, pair them one at a time per the manual.
You should test the connection and view quality before finalizing mounts.

Real-world performance and road testing
You’ll want to evaluate how this system performs during the day, at night, in rain, and while towing. The combination of 1080p resolution, full-color night vision, and low latency gives you a clear, responsive picture in most conditions.
Below are practical notes about what to expect during different use cases so you can decide how it will fit your needs.
Daytime clarity and color accuracy
During daylight, 1080p resolution delivers clear images suitable for backing and tight maneuvers. Colors are accurate enough to identify lights and painted lines, and the wide angle helps you see objects approaching from the sides.
You may notice compression artifacts at extreme distances, but close-range detail (within 30–50 ft) is consistently good.
Night and low-light driving
Full-color night vision provides a better sense of the scene than monochrome images and helps you quickly identify red taillights and reflective markings. The automatic smart brightness adjustment reduces glare on the monitor so the display won’t blind you at night.
If conditions are very dark, supplemental lighting will still be the most reliable way to ensure crisp color images.
Bad weather and moisture resistance
The camera housing is designed for outdoor use, but heavy rain, mud, or snow will affect visibility as they do with any camera. You should install the camera under an overhang if possible, and keep a small brush or cloth available to clear the lens during long trips.
If you often drive in salty, corrosive environments, check seals periodically and rinse connections to prevent corrosion.
Towing and hitching performance
When you’re hitching a trailer, the camera’s wide angle and near-zero latency let you see the hitch and latch alignment in real-time. You’ll likely find backing into a hitch is much easier with the live view and the ability to zoom or adjust the camera feed.
For very long trailers, you may still want an additional camera mounted on the trailer tongue for the clearest hitch view.
Settings and customization
You’ll be glad to know the monitor supports various adjustments, such as brightness, exposure, mirroring, and potentially split-screen options. Spend a few minutes fine-tuning these settings once installed to match your vehicle’s mounting height and your personal preference.
Save your settings after adjustments so you don’t need to reconfigure after power loss or firmware updates.
Smart brightness, exposure, and white balance
Smart brightness helps prevent nighttime glare, and adjusting exposure or white balance can improve contrast in very bright or very dim scenes. You’ll want to tweak exposure if the image is consistently too dark or too bright.
If the system allows white balance adjustments, you can refine color tone under varying lighting conditions for more natural-looking images.

Maintenance and longevity
You should treat the camera system as a long-term safety investment and give it regular checks. A small maintenance routine will extend service life and reduce the chances of failure when you need it most.
Routine checks
Monthly inspections should include lens cleanliness, secure mountings, cable integrity, and tight electrical connections. After heavy weather or rough roads, verify that the camera alignment hasn’t shifted.
For the monitor, keep vents clear and avoid prolonged exposure to direct sunlight through windshields to prevent screen overheating.
SD card care for DVR function
When using continuous recording, choose a high-endurance SD card specifically rated for surveillance or dashcam use. Periodically reformat the card in the camera or monitor to maintain stability and reduce file corruption.
If you plan to retain footage for weeks or months, back up important clips to another drive.
Troubleshooting common issues
You’ll probably encounter a few hiccups during setup or extended use; here are common problems and what to try first.
No video or blank screen
- Check power to both camera and monitor (fuse, connectors, ground).
- Ensure the camera is paired and the channel is set correctly.
- Move closer for initial pairing to ensure strong signal.
Intermittent signal dropouts
- Look for obstructions or metal surfaces between camera and monitor.
- Reposition antennas for better line-of-sight.
- Reduce nearby 2.4 GHz interference (Wi-Fi, other radios) where possible.
Poor image at night
- Clean the lens and check for condensation inside the housing.
- Verify that any auxiliary lights are working if full-color night mode relies on them.
- Adjust monitor brightness/exposure settings.
DVR not recording or playback problems
- Confirm the SD card is inserted and recognized.
- Use a recommended high-endurance card and format it in the device.
- Check for firmware updates if recording stability is an issue.

Tips to maximize performance
You want this system to work reliably under all conditions. Small changes in placement and configuration can yield big improvements.
- Mount the camera as centrally and as high as possible for the best perspective.
- Keep antennas oriented vertically and away from metal obstructions for better signal strength.
- Use a dedicated power source or a proper fuse tap to avoid voltage drops during heavy accessory use.
- Choose a high-endurance SD card and format it in the device before first use.
- If you experience interference in crowded areas, switch off nearby personal Wi-Fi hotspots while pairing or reposition the monitor.
Accessories you might want
You’ll likely want a few extras to get the best use out of the system and protect your investment.
- High-endurance SD card (check manual for supported sizes)
- Weatherproof cable grommets and silicone sealant
- Extra wireless cameras if you want side or front views (system supports up to 4)
- Cable clips and conduit for neat wiring
- Professional installation tools or an install kit for RVs and trailers
Comparison with wired systems and other wireless options
You’ll weigh trade-offs between wireless convenience and wired reliability. Wired systems eliminate much of the interference concern and can handle higher resolutions or lower latency in certain scenarios, but wiring a trailer or camper can be laborious and expensive.
Compared with other wireless systems, the Haloview BT7’s combination of 1080p, full-color night vision, 7″ touch monitor, built-in DVR, and a nearly 1,000 ft line-of-sight range puts it toward the higher-end of consumer wireless backup systems.
Wired vs wireless
If you tow a trailer that already has a wiring harness or you prefer absolute reliability, wired may be preferable. If you switch cameras between vehicles or want a simpler install, wireless tends to be faster and cleaner.
Other wireless brands
Different manufacturers trade off range, resolution, and latency. You’ll want to compare uptime, customer support, and ease of pairing. Haloview is known for practical feature sets aimed at RV and truck owners, so you’ll get a solid mix of features for the price point.
Pros and cons
You should look at the balance of advantages and limitations to decide if this system fits your needs.
Pros
- High-resolution 1080p camera for clear images.
- Full-color night vision for improved low-light identification.
- 7″ responsive touch monitor with smart brightness.
- Built-in DVR for real-time recording and playback.
- Supports up to 4 wireless cameras and works across 10–32V systems.
- Strong advertised range (up to 984 ft line-of-sight).
Cons
- Real-world wireless range can be affected by obstructions and interference.
- Full-color night vision may still depend on ambient or supplemental lighting in very dark conditions.
- SD card capacity/support details should be confirmed (manual) since not all systems support the same maximum size.
- As with any wireless system, there can be rare signal interruptions in dense, metal-heavy environments.
Who should buy this system
You should consider the Haloview BT7 if any of the following apply:
- You frequently back a large RV, trailer, or camper and want a simple wireless setup.
- You want recording capability without buying a separate dashcam or DVR.
- You like touchscreen controls and a modern-looking monitor.
- You need multi-camera support for monitoring different angles while towing.
If you prefer a completely wired approach or operate in extremely harsh electromagnetic environments where wireless is unreliable, consider a wired system or consult an installer.
Legal and safety considerations
You should always comply with local laws around camera use and display screens while driving. Many jurisdictions prohibit monitors that obstruct the driver’s forward view or distract the driver. Position the monitor so it’s easily visible but not intrusive, and use it primarily when parked or maneuvering at low speed.
Also, ensure wiring does not interfere with safety systems, airbags, or pedestrian pathways on your vehicle.
Final verdict
If you want a feature-rich wireless backup camera system with a solid balance of image quality, night performance, and convenience, the Haloview BT7 Touch RV Backup Camera Wireless 2.4G Digita FHD 1080P DVR Rearview Full-Color Night Vision Cam and 7″ Touch Screen Monitor System ticks many boxes. You’ll get a responsive touch monitor, built-in recording, multi-camera support, and a transmission range suitable for most RV and towing situations.
Plan your installation, pick the right SD card, and position antennas for optimal performance. With those steps, this system can significantly improve your rear visibility, make hitching easier, and provide useful recorded footage when you need it.

Disclosure: As an Amazon Associate, I earn from qualifying purchases.